
How to Sort Data in Excel: A Comprehensive Guide

Sorting data in Excel is a fundamental skill that allows users to organize information in meaningful ways. Whether you're working with large datasets, analyzing sales reports, or managing inventory, sorting can make your data more readable and useful.
In this blog post, we’ll cover the various ways to sort data in Excel, from simple sorts to more advanced multi-level sorting, and why sorting is an essential feature for data analysis.
Basic Sorting in Excel
Excel allows you to quickly sort data based on the values in one column. Here’s how to do it:
Step 1: Select the Data Range
- Highlight the range of data you want to sort. If your dataset includes headers (e.g., column labels), make sure to include those too.
Step 2: Open the Sort Option
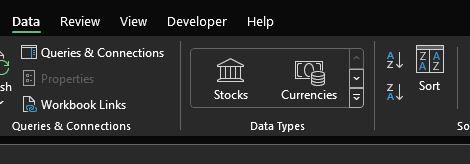
- Go to the Data tab on the Ribbon.
- Click on either Sort A to Z (for ascending order) or Sort Z to A (for descending order).
Step 3: Verify the Range
- Excel will automatically detect if your data has headers. If it does, ensure that the "My data has headers" option is checked.
Sorting by One Column
Let’s say you have a list of sales figures, and you want to sort them from highest to lowest. Here’s how to do that:
- Select the Column to Sort By:
- Click anywhere in the column that contains the data you want to sort.
- Sort A to Z or Z to A:
- For numeric values: Click on Sort Smallest to Largest or Sort Largest to Smallest.
- For text values: Click on Sort A to Z (alphabetical order) or Sort Z to A (reverse alphabetical order).
Example:
If you have a column of sales data in Column B, you would click anywhere in Column B and then select Sort Largest to Smallest to see the highest sales figures at the top.
Sorting by Multiple Columns (Multi-Level Sorting)
Sometimes, sorting by one column isn’t enough. If you have duplicate values in one column, you may want to sort by a second or third column to organize the data further.
Step 1: Open the Sort Dialog Box
- Go to the Data tab and click Sort (instead of the one-click A-Z or Z-A sort).
Step 2: Add Sorting Levels
- In the Sort dialog box, click Add Level to sort by additional columns.
- Select the first column to sort by in the Sort by dropdown.
- For each additional level, select another column from the Then by dropdown.
Example:
Imagine you have a list of employees with columns for Department, Last Name, and Salary. You want to first sort by Department, then by Last Name, and finally by Salary in descending order. Here’s how to do it:
- In the Sort by field, select Department.
- Click Add Level and select Last Name.
- Click Add Level again and choose Salary, and then select Largest to Smallest.
This will organize the employees first by department, then alphabetically by last name within each department, and finally by salary within each group.
Sorting by Custom Lists
Excel also allows you to sort data using custom lists. This is especially useful when sorting months, weekdays, or other non-alphabetical data.
Step 1: Open the Sort Dialog Box
- Go to Data → Sort, and select the column you want to sort.
Step 2: Choose Custom List
- Under Order, select Custom List.
Step 3: Select a Predefined List or Create a Custom List
- Excel has built-in custom lists for months (e.g., January, February) and days (e.g., Monday, Tuesday). You can also create your own custom lists to use for sorting.
Example:
If you're sorting by a column that contains months (e.g., January, February), Excel will automatically recognize the sequence and sort accordingly. This saves you from having to manually define the order.
Sorting Data with Formulas or Errors
When sorting columns that contain formulas or errors (such as #DIV/0! or #N/A), Excel follows specific rules:
- Formulas: Excel sorts cells with formulas just like regular values.
- Error Values: Excel will always place error values (e.g.,
#VALUE!) at the bottom, regardless of whether you are sorting in ascending or descending order.
To avoid complications with sorting when formulas or errors are involved, consider filtering out error values first before sorting the rest of the data.
Sort by Cell or Font Color
Excel allows you to sort based on formatting such as cell color, font color, or icon sets.
Step 1: Open the Sort Dialog Box
- Go to Data → Sort and select the column with the color formatting.
Step 2: Choose to Sort by Color
- In the Sort by dropdown, select Cell Color, Font Color, or Icon (if you’re using conditional formatting icons).
- Choose the specific color or icon to sort by, and whether it should appear on top or bottom.
Example:
If you’ve highlighted certain cells in a “Priority” column using a red fill for high priority, yellow for medium, and green for low, you can sort by color to bring high-priority items to the top.
Using Sort in PivotTables
Sorting within PivotTables is slightly different from sorting in regular Excel tables. Here’s how you can do it:
- Click on the Column or Row Label: In the PivotTable, click on the column or row label you want to sort.
- Right-Click to Access Sorting Options: Right-click and choose Sort from the context menu.
- Sort Ascending or Descending: Choose either Sort A to Z or Sort Z to A to reorder the PivotTable.
PivotTable sorting can be applied not only to labels but also to values within the table.
Common Excel Sorting Mistakes to Avoid
- Not Selecting the Entire Data Range: If you only select a column instead of the whole table, Excel will prompt you with an option to expand the selection. Always sort the entire dataset to avoid misaligning your data.
- Not Checking "My Data Has Headers": If your dataset includes headers, make sure to check the "My data has headers" box in the sort dialog. If unchecked, Excel might include the headers in the sort, leading to confusion.
- Sorting Without Saving: Always save your data before performing a sort, especially when working with large datasets. Mistakes in sorting can lead to data misalignment, making it difficult to revert back.
Why Sorting is Essential in Excel
Sorting in Excel isn’t just about arranging your data neatly. It plays a key role in:
- Data Analysis: Sorting allows you to quickly find trends, outliers, and patterns in your data.
- Reporting: A well-sorted dataset makes reports more presentable and easier to interpret.
- Improving Efficiency: By sorting data, you can reduce the time spent searching for specific information and improve your decision-making process.
Sorting data in Excel is a crucial skill for organizing and analyzing information efficiently. Whether you’re performing simple sorts or working with multi-level sorts across complex datasets, Excel provides a variety of tools to help you stay organized. By mastering the sorting features, you can enhance your data analysis capabilities and improve your productivity in Excel.